Scenario
I encountered issues with the internet service received from my ISP. I started doing speed tests but this was time consuming and wasn’t effective as a manual task.
I needed a way to automate the speedtest measurements so it could provide me with data that I could then review. The idea being that we could identify a trend and work out what could be causing the issue i.e. linked to work at the exchange or only drops during peak hours etc. This would also help me to help them work out the issue and simultaneously support a stronger case if I needed to make a complaint/escalate the matter.
I decided to use this huge inconvenience (thanks ISP!) and turn it into an opportunity for a mini project!
High level requirements
- Use a tool that is capable of running speed tests
- Decide the most suitable OS and hardware to use for this project
- A CLI to run commands and build a script to run the speed tests
- Log the measurements in a file so we can view when needed. This should include key performance indicators such as upload and download speeds with respective times and dates
- Automate the script to run (at desired intervals)
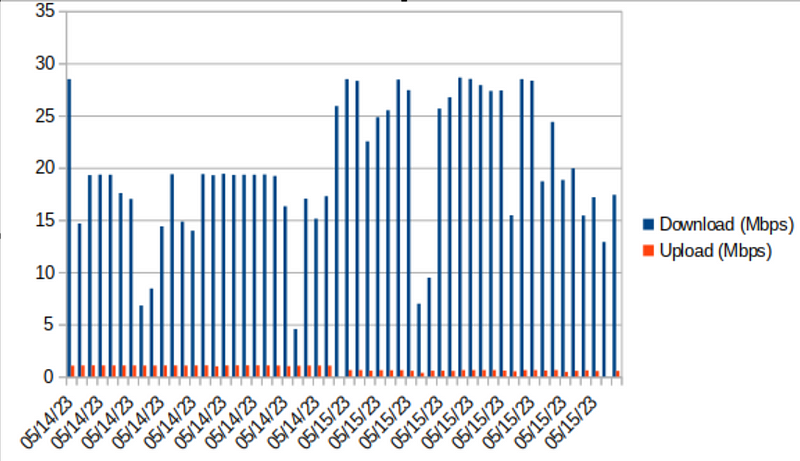
- Plot the data on a simple graph for easier consumption
Solution plan
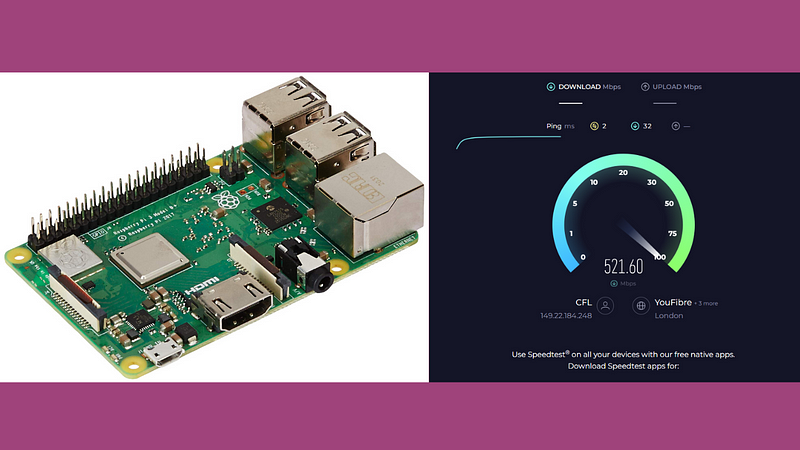
- Tool: We’ll use speedtest.net as the actual performance measuring tool
- Hardware: I will use a Raspberry Pi. Reason being that I wanted to leave this running, so building this tool on the Pi was the most cost effective way from an electric bill standpoint
- OS: Raspberry Pi which is a Linux, Debian distro — Raspbian (I will also build an option for Windows users from Powershell but this would be my second option due to my hardware preference)
- CLI option: will be bash as it’s native to Raspbian
- Script: Will be created using a Python
- Measurement file type: csv as this will be a versatile option and provide more options for those that want to visualize the data differently
- Automation: Crontab (built into most Linux distros)
- Data visualization: Libreoffice — bar graph (built into most Linux distros). We could also leverage Google Workspace or Grafana but these weren’t needed for my needs and were overkill respectively
Sneakpeak: Here’s what we’ll end up with
1a. Raspberry Pi preparation
I’m using a virtual machine to reenact the setup for demonstration purposes. I’ve installed a fresh copy of Raspbian. My current version is found using; lsb_release -a
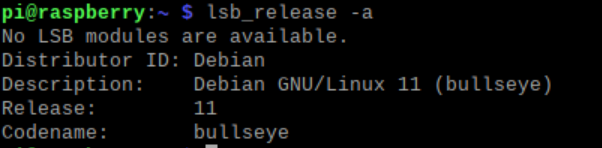
If you decide to follow my guide and encounter any prolonged issues then I’d suggest installing a fresh copy of Raspbian or mirroring my version.
Ensure our Raspberry Pi is up to date
- sudo apt-get update && sudo apt-get upgrade -y
We’ll install some packages so that we can add the package repository for the Speedtest CLI software
- sudo apt install apt-transport-https gnupg1 dirmngr lsb-release -y
- The apt-transport-https package is used to add support for the https protocol to the apt package manager. If you encounter problems from apt when connecting to Ookla’s package repository then this could be the cause
- Additionally, we also install the gnupg1 package. This is used to establish a secure communication path between your Raspberry Pi and the Speedtest.net servers
- Now we can install the dirmngr package. This is adds the package repository to your Raspberry Pi’s sources list
- Finally, we install “lsb-release“. This package outputs the operating systems version/release name
With the packages installed, we can add the GPG key for Ookla’s Speedtest repository to the keychain
- We need this keychain to be able to download the speedtest command line interface to our Raspberry Pi
- curl -L https://packagecloud.io/ookla/speedtest-cli/gpgkey | gpg — dearmor | sudo tee /usr/share/keyrings/speedtestcli-archive-keyring.gpg >/dev/null
Next we need to add the Ookla repository to our sources list
- Without adding the repository, we might not be able to install the Speedtest CLI to our Raspberry Pi. This appears to be an issue with previous versions
- echo “deb [signed-by=/usr/share/keyrings/speedtestcli-archive-keyring.gpg] https://packagecloud.io/ookla/speedtest-cli/debian/ $(lsb_release -cs) main” | sudo tee /etc/apt/sources.list.d/speedtest.list
As we added a new package repository we need to update our package list
- sudo apt-get update && sudo apt-get upgrade -y
1b. Install speedtest cli
We’re ready to install the Speedtest CLI
- sudo apt-get install speedtest
- If you get an error saying “cannot be located…” then you’re likely to encounter an issue with Ookla sending the data back. Double check all the commands have been entered correctly as most issues are linked to this. If you do need to remove the package and restart the installation of speedtest, then;
- sudo rm /etc/apt/sources.list.d/speedtest.list
- sudo apt-get update
- sudo apt-get remove speedtest
We can now test that we have installed the speedtest software to our Raspberry Pi
- Simply input Speedtest and press enter
- Upon first execution of the speedtest software you should be prompted to agree to some terms and conditions
- If you don’t get the option to accept the license agreement/EULA, then you may not have installed Speedtest properly, so you may encounter issues later on. If you install using speedtest-cli command you may face problems
- There are multiple switches/arguments that are available. To view options, input speedtest -help
- Now we have the tool that can run speed tests but we want these to be run throughout the day as opposed to me doing them manually throughout the day, so we need to create a script that handle this need [python]
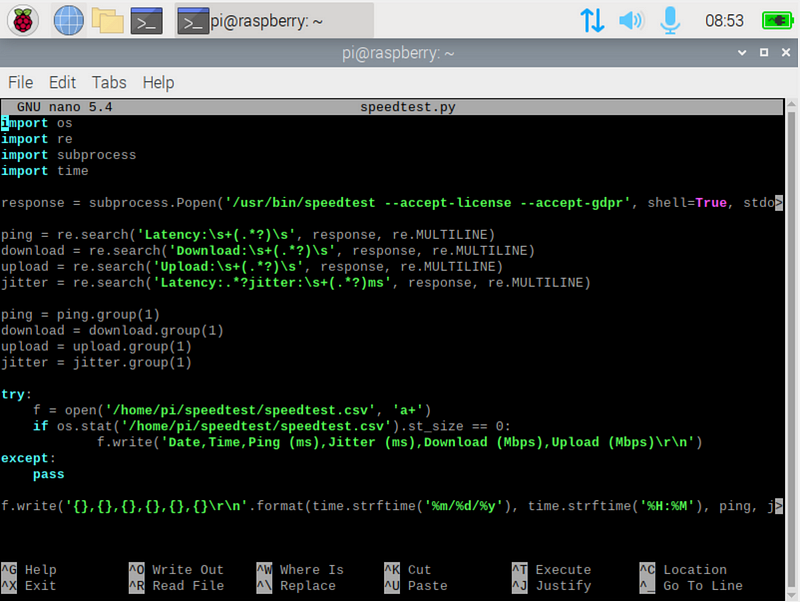
2a. Create a script to run this command — Python
Will use python to write our script
- begin creating our Python script, ensuring you’re in the home directory, if unsure then enter cd ~
- We’ll use nano to write our script, enter nano speedtest.py
Copy and paste the following;
import os
import re
import subprocess
import time
response = subprocess.Popen(‘/usr/bin/speedtest — accept-license — accept-gdpr’, shell=True, stdout=subprocess.PIPE).stdout.read().decode(‘utf-8’)
ping = re.search(‘Latency:\s+(.*?)\s’, response, re.MULTILINE)
download = re.search(‘Download:\s+(.*?)\s’, response, re.MULTILINE)
upload = re.search(‘Upload:\s+(.*?)\s’, response, re.MULTILINE)
jitter = re.search(‘Latency:.*?jitter:\s+(.*?)ms’, response, re.MULTILINE)
ping = ping.group(1)
download = download.group(1)
upload = upload.group(1)
jitter = jitter.group(1)
try:
f = open(‘/home/pi/speedtest/speedtest.csv’, ‘a+’)
if os.stat(‘/home/pi/speedtest/speedtest.csv’).st_size == 0:
f.write(‘Date,Time,Ping (ms),Jitter (ms),Download (Mbps),Upload (Mbps)\r\n’)
except:
pass
f.write(‘{},{},{},{},{},{}\r\n’.format(time.strftime(‘%m/%d/%y’), time.strftime(‘%H:%M’), ping, jitter, download, upload))
- Note: When copying or pasting, the structure may not transfer correctly, causing errors in runtime. The script should look like this in regards to indentation and also replace the apostrophies so that the green coloured text becomes apparent. The apostrophy is the ‘ character
I’ll take a moment to explain this script, so those of you that wish to amend it can do so;
import os
import re
import subprocess
import time
These statements call out the library dependencies that we’ll be using in our script.
import os: The os library is used by the script to interact with the operating system itself. We’ll use this library to check for the presence of a file
import re: The re library enables us to do regular expressions by providing a library for handling pattern searches. We use this to pin point the desired values from the default data output given to us from Speedtest
import subprocess: The subprocess library is required to call another python script. In our case, it’ll let us invoke the Speedtest CLI software and retrieve the values returned by it
import time: We need the time library so that we can record both the date and time for each call to the Speedtest CLI software. This is key to identifying any trends in data
response = subprocess.Popen(‘/usr/bin/speedtest — accept-license — accept-gdpr’, shell=True, stdout=subprocess.PIPE).stdout.read().decode(‘utf-8’)
We utilize the subprocess library to launch a call to the Speedtest CLI and tell it to pipe everything from speedtest to stdout.
By using stdout.read().decode(‘utf-8’) at the end of the call we store the response from the Speedtest CLI to our response variable and decode it to being a useable Python string.
ping = re.search(‘Latency:\s+(.*?)\s’, response, re.MULTILINE)
download = re.search(‘Download:\s+(.*?)\s’, response, re.MULTILINE)
upload = re.search(‘Upload:\s+(.*?)\s’, response, re.MULTILINE)
jitter = re.search(‘Latency:.*?jitter:\s+(.*?)ms’, response, re.MULTILINE)
These lines of code essentially all do the same thing. They use the re library to run a regular expression (regex) for a certain piece of text and find the number located next to each piece of text.
For instance, the search for ping finds the expression “Latency: 36.943 ms” but will only retrieve the number that is between the text — which is all we want.
ping = ping.group(1)
download = download.group(1)
upload = upload.group(1)
jitter = jitter.group(1)
These lines let us use the “.group()” function to retrieve the correct numbers from our regular expressions. Using this we will get the values we’re after from the output of the Speedtest CLI software that we can output to our CSV file.
try:
f = open(‘/home/pi/speedtest/speedtest.csv’, ‘a+’)
if os.stat(‘/home/pi/speedtest/speedtest.csv’).st_size == 0:
f.write(‘Date,Time,Ping (ms),Jitter (ms),Download (Mbps),Upload (Mbps)\r\n’)
Except:
Pass
This code is kept within a try statement so that if any errors occur, it won’t halt the script from running.
Within the try statement, we first open up a call to our speedtest.csv file. Adjust the directory if your user isn’t called “pi“.
By using, “a+” in the arguments, we tell it that we want to create the file if it doesn’t exist and that any new data should be appended to whatever is already in there, otherwise it’ll keep creating new files or come up with an error.
Afterward, we use the os library to check our speedtest.csv files actual size in bytes. If the file’s bytes is equal to 0, we go ahead. If the file does exist we proceed as normal.
f.write(‘{},{},{},{},{},{}\r\n’.format(time.strftime(‘%m/%d/%y’), time.strftime(‘%H:%M’), ping, jitter, download, upload))
Now, we print out all our data separated by commas. This makes it compatible for our desired csv file format.
We use the time library’s strftime() function to insert both the current date and the current time into our formatted string. After that, we insert our ping, download, and upload.
Here is an example of what the raw output data should look like
Date,Time,Ping (ms),Jitter (ms),Download (Mbps),Upload (Mbps)
04/29/21,06:28,18.32,1.21,23.30,7.78
You can now save the file by pressing CTRL + X then Y and press ENTER.
With the script now complete, we need to make a folder where our speedtest.csv file will be stored
- mkdir ~/speedtest
We’ve made the required folder, so we can go ahead and test it
- Python3 ~/speedtest.py
- Note there will be a brief pause with no output
- If you get an error “unrecognized arguments: –accept-license –accept-gdpr” then it’s likely you didn’t get the related prompt when you ran speedtest for the first time as mentioned previously. You maybe able to resolve the issue by omitting this section of code from the script and save/exit. Run the script again and it should work. If not, then use a fresh install of Debian if not done so already.
Once the script has finished executing, you can check out the results by opening up the newly created speedtest.csv.
2b. View our speed data — csv file
Check Python script works
- nano ~/speedtest/speedtest.csv
- Within this file, you should see something like what we have below. The column headers and some rows of data.

Date,Time,Ping (ms),Jitter (ms),Download (Mbps),Upload (Mbps)
04/29/21,06:28,18.32,1.21,23.30,7.78
2c. Run/automate this python script at regular intervals/times — Crontab
We can use crontab in linux to run this for us at set intervals
- The easiest way to automate your script to run every so often is to make use of the crontab
- crontab -e
- If you are asked what editor you want to use, I’d go with nano as it’s the easiest to use — just enter 1
- Within this file, append the following command to the bottom
- */15 * * * * python3 /home/pi/speedtest.py
- This cronjob will run every 15 minutes. Simply change this number if you’d like a different timing interval which is in minutes
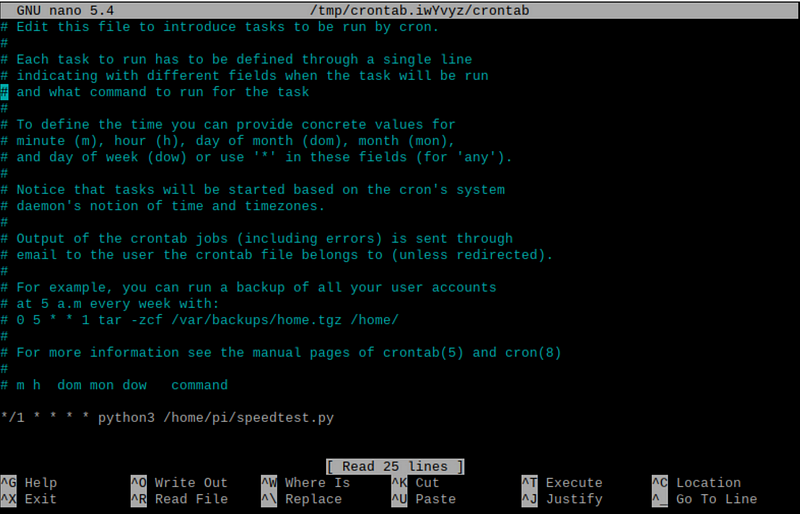
- Once done, save the file by pressing CTRL + X, then Y, followed by ENTER
- The crontab will automatically be updated and will begin to run your script immediately.
- Tip: test the cronjob works by setting it to 1, which will run every minute. This is so that you don’t wait 30 mins before finding out something hasn’t worked! Remember to put it back to the desired interval once test is successful
3. Libre office & Excel — View our speed data and present data in a chart
- This will make it easier to identify and analyse the data we’ve captured
- Libreoffice is built into Raspbian so we can use this as a Microsoft Excel/Google Sheets alternative
- We’ve formatted the data in csv format so it can be opened in Excel. This is useful because if you need to send over to your ISP they are most likely to have Excel over the other options mentioned. For security reasons they may not want to open office files from customers due to concerns around malicious macros and rightly so!
- To create a chart, simply highlight the required fields (holding down CTRL and select the desired column), click on insert and choose your chart format. I’ll go with a simple bar graph as that’s all I need for my analysis.
That’s it — we’ve now completed this project. I hope you find this useful and with any luck it’s helped you identify the root cause of your performance issues!
Notes/Caveats
- When measuring high speed internet, you need to consider performance bottlenecks. In my case, I am using a Raspberry Pi 3b+ and the speed measured was 320 Mbps download vs 528 Mbps from my Dell laptop. Both these devices were connected to the same switch for a fair comparison. This meant that my Raspberry Pi was causing a bottleneck in performance (not the ISP in this specific instance)
- Measurements need to be taken from a wired connection to the primary router which provides internet to your home (likely to be one provided by your ISP). This helps avoid other factors affecting the measurements such as wifi interference
- Wired connection doesn’t need to be direct so it could be via powerline adapters and switches but there should be a continuous wired connection from the primary router to the device being used to take the measurements (Raspberry Pi in my case)
- Wired connection needs to be suitable for the speeds you’re expecting. If you’re expecting to receive and measure 1 Gbps internet speeds then you cannot have Cat 5 type ethernet cable anywhere on the connection as this would affect the speed performance and therefore measurements. See this link which provides a graph to understand the performance associated with different cable types; https://www.google.com/url?sa=i&url=https%3A%2F%2Fwww.firewall.cx%2Fnetworking-topics%2Fcabling-utp-fibre%2F112-network-cabling-utp.html&psig=AOvVaw2WcJYgulZtUz_8ot2Rag-Q&ust=1685953970037000&source=images&cd=vfe&ved=0CBAQjRxqFwoTCLDsi46aqf8CFQAAAAAdAAAAABAI
- The cable type/rating is usually printed on the cable itself. The same principle goes for powerline adapters, switches and anything else within the point to point connection. All hardware should have sufficient capacity that exceeds the internet speeds that you’re hoping to achieve. In my case I was hoping to receive 500Mbps so all my hardware (except the Pi) needed to be rated above this threshold — Laptop, ethernet cables, switches and router.
- Credit to Gus over at https://pimylifeup.com who inspired the project
Leave a Reply
You must be logged in to post a comment.