Active directory — How to join a Linux Ubuntu client machine into an Active Directory Domain

In this tutorial, we’ll go through the steps of joining a Linux Ubuntu client machine to an Active Directory Domain (AD DS).
In my guide, I’ll be using a virtual machine (VirtualBox) to host the Linux client and Windows server, however the steps can be followed if the operating systems are also physically installed — there is no difference in the setup procedure.
Pre-requisites
- Setup your Active Directory Domain Services already — see this guide if you need; https://medium.com/@techbeatz/how-to-setup-an-active-directory-lab-d4c454bb4753
- Download the Linux ISO file — I’ll be using Ubuntu desktop in this guide
- Physical machine capable of running at least 2 virtual machines (Server and Client machines)
- If you have both the Active Directory server/Domain Controller and Linux client machine installed and ready to join to the Domain, then skip to step 4
- Setup virtual machine instance — Linux Ubuntu machine
Settings: CPU and RAM can be set to around 25% of physical/host machine | Network adapter 1 will be set an Internal network (so it will be on the same network as the Domain Controller) | Attach your Linux ISO to the storage | Storage can be set according to your needs and how you’ll use the machine — if unsure then the default settings will be fine for most users.
2. Linux Ubuntu installation
Start the virtual machine and as long as you’ve “attached” the ISO file correctly, the system will find the file according to the boot order preference and start the installation process. Linux make this process rather simple so essentially you just need to follow the on-screen guidance. Once the OS has installed, you’ll be prompted to login for the first time and move onto the next step
Tip: You may want to rename your Linux machine so that it’s easier to find from the Server or to follow a particular naming convention. You can do this via Terminal and enter the following command: sudo nano /etc/hostname and change the existing name that’s already in the file, save and exit.
3. Linux Client network configuration
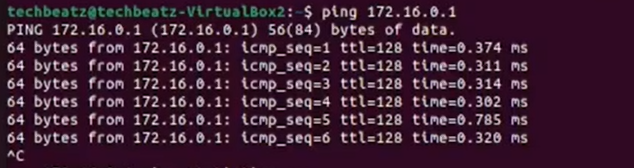
Check to see that you can communicate with your Domain controller (hence why we changed the virtual NIC adapter to an internal adapter (default is NAT). There are other ways that you could achieve this goal but there are too many variations to cover in this guide. Test communication from the Linux client to the server using Terminal. You can ping the server’s IP address (should be set to a static address).
You can also ping using the domain name as this will check DNS is also working.
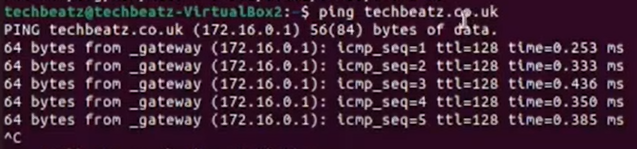
If this test is successful then it confirms that the Linux client has a valid IP address, is able to communicate with the domain at a network level and is ready for the next steps.
Alternate setting: If your infrastructure setup is different to mine, especially the networking configuration (NIC and DHCP) settings then you still might not be able to communicate between the Client and Server. Here is an alternate setup which may meet your needs if different to mine;
- Machine name: Adjust your hostname to <hostname.mydomain.local> in /etc/hostname
- DNS: Adjust your DNS Settings in /etc/resolv.conf to the IP of the Domain Controller
- Now you should be able to 1. ping <yourdomain.local> and 2. use realm to find the domain
4. Install file dependencies on Linux to work with Active directory
In order to join a Linux client machine to a Windows Active Directory Domain, we need to download the following dependency files.

Once installed successfully, you should see a Kerberos authentication prompt as follows
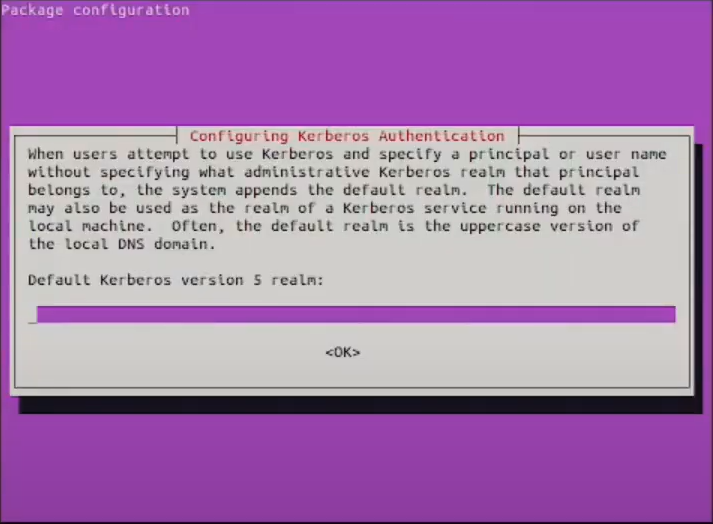
At this stage, you need to enter your Active Directory Domain name in capital letters, then press Enter.
5. Join Linux client machine to Active directory
Now we’re ready to officially join the domain. Enter the following command to do so

You need to input your own domain name in place of <techbeatz.co.uk> and use any user with administrator privileges on your Active Directory Domain i.e. the default Administrator account which is created by default during setup. This user is approving the request for this computer to join the domain (security feature). Once you press Enter, you’ll be prompted for the Admin user password — input and press enter again.
At this point the computer should be joined to the domain if you receive no error messages i.e. it does not confirm the instruction was successful (just the way Linux systems work). In many instances you may get the following error;

If this is the case then we’ll need to amend a Kerberos configuration file. Enter the following command

This allows us to use an editor to amend the file. Once you press enter, the file will open for editing. Underneath [libdefaults], set rdns to false as follows

Then press Ctrl and X to exit and press Y to save before exiting.
Now try to repeat the command of joining to the domain and if successful, you’ll see a return carriage awaiting the next command (which means it was successful) as follows

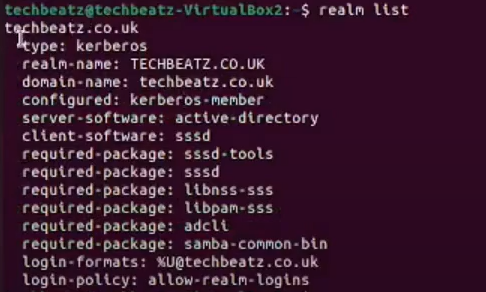
To obtain a more verbose confirmation that the machine has joined, we can enter the command realm list which will provide us the domain details or “realm” to be specific.
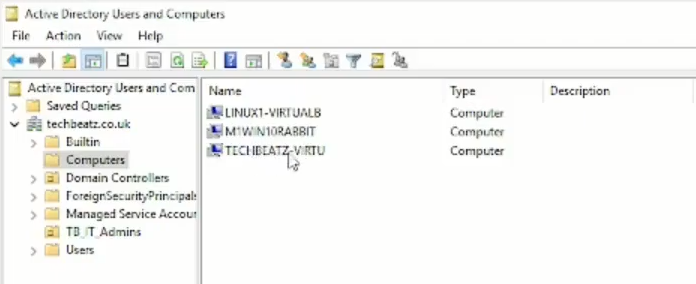
To reaffirm the join has been successful, we can also check Active Directory Domain Services on your Windows server. Go into Active Directory Users & Computers snap in, Computers and you should see the machine name (hostname of Linux machine) populate the details.
Links
Video tutorial if you prefer to watch the the tutorial instead; https://youtu.be/4x_RSvpY6OE
Additional information
Here is some information regarding the packages we downloaded;
Realmd — this provides a simple way to discover and join identity domains. It can run a discovery search to identify available AD and Identity Management domains and then join the system to the domain, as well as set up the required client services used to connect to the given identity domain and manage user access.
SSSD — this is necessary to use Kerberos Authentication. SSSD as an underlying service supports multiple domains.
Samba — an important component to seamlessly integrate Linux/Unix Servers and Desktops into Active Directory environments. It can function both as a domain controller or as a regular domain member
adcli — command line tool that can perform actions in an Active Directory domain. Among other things it can be used to join a computer to a domain
Ntp — network time protocol used to synchronize time, date and timezone. This allows underlying protocols to function properly